


::{{D.I.Y Tutorial}}:: Embossed Suite Signs
>> Wednesday, August 4, 2010
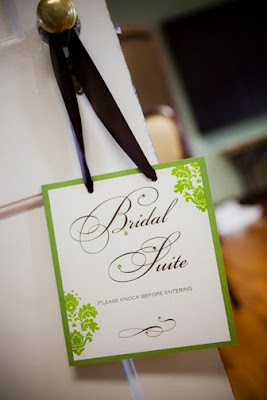
{CREDIT: Sam Dean Photography}
Materials::
- 8 ½ x 11 Heavy Cardstock (cover weight)
- 12 x 12 Cardstock
- Xyron Adhesive Runner Glue (found in scrapbook aisle)
- Size SS08 & SS10 Hotfix Flatback Rhinestones (artbeads.com)
- Hotfix Tool
- Rubber Stamp
- Pigment Inkpad
- Embossing Powder
- Embossing Tool
- Ribbon (7/8” or 1.5”)
- Hole Puncher
- Paper Cutter
- Printer
Directions::
1. In Microsoft Word go to the INSERT tab and choose TEXT BOX. Bake a text box with borders the same size as the SAMPLE page. I am not sure of the exact measurement you will have to “guestimate.” Next create another text box and enter the word “Bridal,” you will then create the rest of the wording using the same process. {NOTE:: Be sure to create a different text box for each word so the boxes can be moved around the page to the desired layout}. Next be sure to double check your spelling, if all is correct it is time to print!
2. Now you are ready to cut out your sign…using a paper cutter of any kind be sure to cut inside or a little outside the black border. You want to be sure there is no black showing after you have cut out the sign.
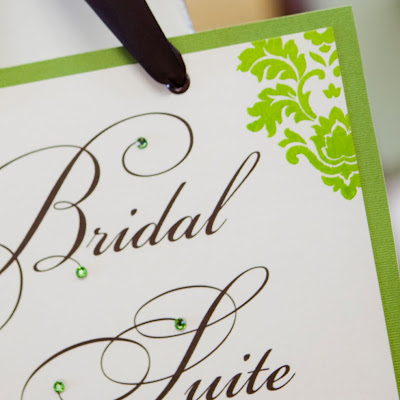
3. It is time to emboss…ink your rubber stamp using the pigment ink pad and stamp it in the desired position on the paper. Next pour a generous amount of embossing powder on the wet ink that you just stamped, tap off the excess back into the bottle. You will now need to use your embossing gun to heat and melt the powder until you get the shine that you are looking for.
4. Next you need to cut out your border paper (12x12 cardstock). Using a paper cutter cut the 12x12 cardstock down to 9x9. This will give the layering affect.
5. It is now time to glue your sign to the border paper using the Xyron Adhesive Glue Runner. Run the glue along all four edges of the sign. Next be sure the placement is correct because this is permanent glue and if you mess up and try to reset the sign, it will tear your background paper.
6. Next you add the crystals using the Hotfix tool and the Hotfix flatback crystals using the instructions that come with the tool. {NOTE:: Hotfix is a crystal that already has glue one the back and is then heated and adhered to the paper using a Hotfix Tool)
7. Once everything is assembled punch two holes in the top of the sign using the single hole-punch tool. Measure .25 inch down and 2.5 inches in on each side.
8. Last you will attach your ribbon. Cut a piece of ribbon about 14 inches long and string through the hole, tie the ends {NOTE:: Use a lighter to seal the ends of the ribbon to prevent fraying}.


2 comments:
Love them! You did such a great job on these :)
Thanks for the tutorial! I've been looking for one on making these! :)
Post a Comment